Hey there! Welcome to the first in a group of long-term posts. This post will kick off a multi-month technology journey: building a telescope!
My mentor, Dr. Proffen, and I are building a fully functioning telescope together. It'll be about the size of a dinner plate, fully coded and able to capture images and rotate to find stars and constellations. Building this is going to be a long process, so I hope you stick around :) This will be the hardest project I've ever done, but I'm super excited for it!
As of right now, we have all our materials ready for the fun to begin. This telescope is mainly made out of 3D printed parts, technology, and lots of metal fasteners. In total, there are 247 3D printed parts in one telescope. Dr. Proffen printed all of the pieces himself, and shipped my set to me. Now that I have everything, let's do some unboxing!
This project was developed by: MattHh on Autodesk Instructables -- https://www.instructables.com/Pi-lomar-3D-Printed-Working-Miniature-Observatory-/
3D printed pieces
3D printed parts make up most of the telescope. We will need to build a base, a tower for the camera to sit on, and the dome that keeps everything contained. Each piece was wrapped in bubble wrap, so it took a long time to unbox this part ;)
 |
The dome is made out of white plastic, mostly to provide a contrast in the design of the telescope. When everything is put together, it will look like a miniaturized observatory! We have parts for the round dome, the opening where the camera looks out, and some extra pieces to represent an open observatory door.
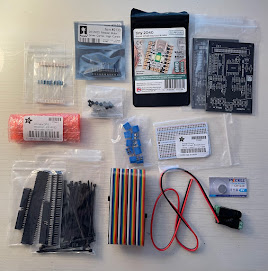
There's a crazy amount of electronics required for this telescope. The system is programmed with a Raspberry Pi 4, connected to a camera to capture images and 2 stepper motors to rotate the camera. I'll go into more detail on what each piece does as we move through the process.
In addition, we need lots of tools to make our telescope function as well as possible. Among other things, I have a wrench set; sandpaper and a filing kit; a soldering iron; wire cutters; power adapters; and more nuts, bolts, and screws that I know what to do with (all organized of course).
Surprise: there's more hardware! In addition to computers and motors, we need things like breadboards to solder with, ribbon cables, and resistors. The telescope requires a tiny2040 microcontroller, as well as a GPS module to be able to track our coordinates in case we take the telescope places. Fun fact: I now own the biggest ribbon cable I have ever seen ;)
Other Parts
Finally, we need some other small construction pieces to finish off our materials list. Among these are 3D printed dowels of varying sizes, silicone adhesive, fun circular levels, and gears to rotate our telescope.
Putting it all away
All of these parts came in 3 big boxes, and I had to fit them into one massive tub. It likely took around an hour and a half to sort through it all, but now everything is organized and ready for building!
Next steps
Now we can finally get on to building the telescope! I've downloaded the required materials for configuring the Raspberry Pi, so our next step is to start constructing the base of the telescope. Keep an eye out for the next post on this journey :) See you all soon!


This is beyond awesome. Love it 💕
ReplyDeleteKatie, this is amazing! It looks so fun! This will be a great project, and I will definitely stay up to date on it!
ReplyDelete<3 - kristen